Showing posts with label vegetarian. Show all posts

A Week Alone & 10 Minute Dinner

>> Sunday, February 20, 2011

My husband left yesterday for business and he'll be gone for a week. That means I'm left to my own devices in the cooking department! I have to say I cook a bit differently when my husband is away, meaning I usually cook things that take no time at all and I cook much lighter. My husband definitely never minds a salad or fruit for dinner, but that isn't something he would really like every day. I also take an opportunity to experiment in the kitchen when he is away because if something goes terribly wrong, I haven't ruined two servings worth of food, but I must say my disasters are becoming less and less.

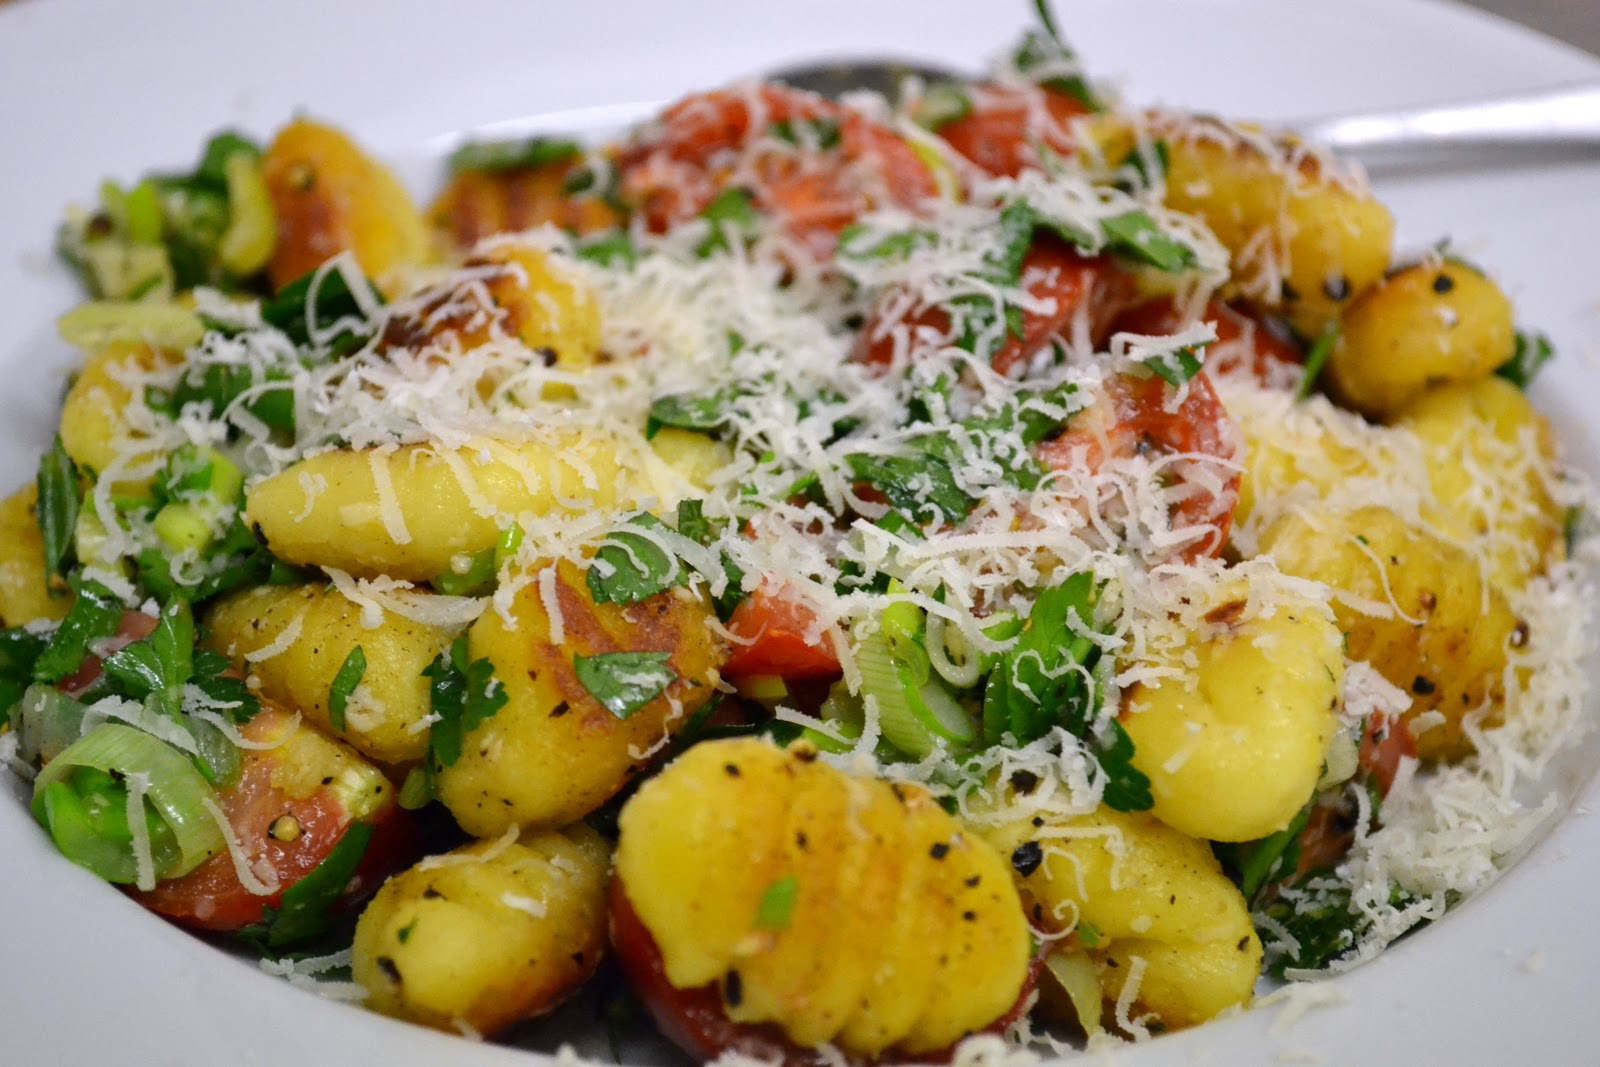
Tonight, I can sum up the way that I felt about cooking by one phrase: I couldn't be bothered. Sorry, I just couldn't. I didn't want to spend all day or all evening in the kitchen, but I wanted something warm, comforting, and not too heavy. I made this in less than 10 minutes and it was exactly what I wanted. I made a wonderful gnocchi dish that was flavored with lemon, parsley, and spring onions. I used pre-made gnocchi for this dish and it was totally worth it. Making gnocchi is time consuming and for my quick meal and lack of motivation, the pre-made gnocchi was the perfect solution. Because pre-made gnocchi can be a bit bland and end up being soggy when you cook them, I fried them in a pan. They turned out with a brown, crispy outside that provided that extra flavor and the inside was soft and warm, just like they should be. The lemon, parsley, and spring onions gave everything a wonderful flavor and with the addition of fresh tomato and grated Parmesan cheese, it rounded out dish to perfection. When you're low on time, or motivation, try this out. You'll love it.

Lemon & Parsley Gnocchi
Serves 1 as a main (can easily be doubled)

1/2 tablespoon butter
1/2 tablespoon olive oil
8oz pre-made gnocchi
1 large spring onion, chopped
3 vine tomatoes, quartered
1 large handful parsley, chopped
juice of 1 lemon
1 tablespoon freshly grated Parmesan, plus more for garnish
salt and pepper

Get all of the ingredients together and heat the butter and oil in a heavy bottomed pan over medium-high heat.

Put the gnocchi in the pan and make sure the gnocchi are in one layer in the pan. Season with salt and pepper. Leave them here and don't turn them for 3 minutes. You want them to become brown. Once they turn brown, turn the heat down to medium-low and turn them over. Cook for an additional 2 minutes.

While the gnocchi are cooking, chop the spring onions, parsley, quarter the tomatoes, and grate the cheese.

Put the lemon, parsley, and Parmesan into a bowl. Mix completely.

Once the gnocchi are browned on both sides, add the spring onion and tomatoes. Turn off the heat at this point and let the onions and tomatoes cook from the residual heat for 2 minutes.

Once the onions tomatoes have slightly softened, add the mixture to the bowl with the parsley, lemon, and Parmesan. Mix everything completely and taste. Adjust the seasoning if necessary.

Pour the gnocchi into a bowl and garnish with a bit of extra Parmesan.

How is that for easy and fast? I have to say I was so happy (and a bit surprised) with how well this turned out and I have to say that cooking the gnocchi in a pan is so much better than just boiling them, especially when you're using pre-made gnocchi. I hope you try this out the next time you want something quick. And, by the way, this will definitely be on the menu the next time I'm dining alone.

Happy Eating!

Read more...

My Go-To Pasta

>> Tuesday, February 8, 2011


I got home pretty late from work tonight, so I wanted to make something quick, easy, warm, and satisfying. I've made this pasta dish a few times now and it just comes out so well every time. The best thing about this is it takes about 30 minutes total so it can be thrown together fast, but it doesn't taste thrown together. My husband really likes this pasta and he's always pleased when I make it.


If you don't like sun-dried tomatoes you might want to stop reading now. The taste of this pasta dish screams sun-dried tomatoes! It's definitely not overpowering, there is just no question what the main ingredient is. 

Sun-Dried Tomato Pasta 
Serves 2 generously as a main

1 small onion, diced
2 teaspoons butter
5oz drained sun dried tomatoes*
6 large black olives, pitted
2 large garlic cloves, peeled
1/4 cup olive oil
1 cup vegetable stock
3 tablespoons cream
handful fresh basil, chopped
1/2 lb spiral pasta, cooked al dente and drained

*I can't find sun-dried tomatoes in oil in my local grocery store (I know, I know) so I just use the dried tomatoes. If you can find them in oil, you can use these (drained) and use a little less olive oil.

Throw the tomatoes, olives, garlic and olive oil into a food processor.

Pulse until everything is chopped and thoroughly combined. I like to keep the mixture relatively chunky. Set the mixture aside.

Heat a heavy-bottomed skillet over medium heat and add the butter. Once the butter has melted, add the onions and cook until translucent, about 5 minutes.

Add the tomato mixture to the pan and cook until the garlic becomes fragrant, about 2 minutes.

Add the vegetable stock and stir. Bring to a boil and then turn down to medium-low. Simmer until the liquid has reduced and the sauce becomes thick, 10-15 minutes. 

While the sauce is simmering, cook the pasta until al dente.

Once the sauce becomes thick, add the cream and mix. Cook until thickened, 3-5 minutes. Taste if the sauce needs salt and pepper at this point. Be careful here, because the tomatoes and olives are naturally salty.

Add the pasta to the pan and mix thoroughly to combine.

Throw in the basil and stir to combine. Taste one more time for seasoning.

Pile into a dish and dive in! You can also add a little bit of grated Parmesan to finish the dish.

This recipe couldn't be easier or more tasty. Give it a try for a pasta fix at the end of a busy day.

Happy Eating!

Read more...

Beautiful Sunday Lunch

>> Sunday, January 23, 2011


I hope you all have had a wonderful weekend and you're all prepared to start another week tomorrow. We had such a nice weekend. It's been busy, but relaxing and just lovely. I've kept myself busy today in the kitchen with some cooking and baking. I shared a couple of ways to roast a bell pepper on Friday, and as promised I'm sharing the gorgeous salad that I made with those peppers. I also want to share with you an extremely easy tomato tart I made. Together, these two came together and it was a beautiful Sunday lunch... not to mention delicious.

Toasted Corn Salad with Lime, Honey, Cilantro Dressing
Serves 2 generously

2 Teaspoons olive oil
2 small to medium ears of corn
1 pint of cherry tomatoes, halved
1 roasted bell pepper, sliced into thin pieces (follow the link to get the technique!)
1 avocado, flesh cut into bite sized pieces
1 small red onion, diced
1 handful cilantro, minced
zest of 1 lime
juice of two limes
2 heaping teaspoons of honey
salt and pepper to taste
Remove all of the kernels of corn on the cobs, and prepare all of the other vegetables. Heat a skillet over medium heat and add the olive oil. Once the oil is heated, add the corn. Cook the corn until it softens, about 8-10 minutes.

While the corn is cooking, get the dressing ready by adding the red onion, zest, lime juice, and honey to a bowl. Mix well and set aside.

Once the corn stars to soften, add about 3/4 of the tomatoes. Cook for an additional 3-5 minutes, or until the tomatoes start to soften.

After the corn and tomatoes have cooked, take them off the heat and allow them to cool for a few minutes (I waited about 5). Meanwhile, add the rest of the ingredients to the dressing.

Add the corn and tomatoes and mix the salad thoroughly. Season with salt and pepper to taste. Put the bowl into the refrigerator and store until you're ready to serve it.

Now, I'll share the quick and easy tarte that I served along-side the salad. I got the recipe originally from Stacey Snacks... she does some amazing tartes, tartaines, and quiches. I've made a few minor changes.

Quick and Easy Tomato Tarte
Adapted from Stacey Snacks
Serves 4 as a side dish

6 large tomatoes
1/4 cup grated white cheddar
1/4 cup grated gruyere
2 heaping teaspoons grain mustard
1 package puff pastry
1 small handful fresh basil, torn into small pieces
1 Tablespoon good olive oil
salt and pepper to taste

You will need a cast iron skillet. Pre-heat your oven to 325F.

Wash the tomatoes and slice them into 1/2" slices.

Arrange the slices at the bottom of the cast iron skillet. Season the tomatoes liberally with salt. Place the skillet in the oven and cook the tomatoes for 50-60 minutes, until the tomatoes are completely soft and have released all of their juices.

Remove the tomatoes from the oven and place a plate on top of the tomatoes. Carefully, drain all of the excess liquid from the pan. After draining, replace the tomatoes if they slid around. Make sure the bottom of the pan is completely covered.

Grate the cheese and sprinkle it on top of the tomatoes. Set aside.

Unroll the puff pastry and brush it with the mustard.The mustard doesn't have to extend to the edges of the pastry because you will end up having to cut off the excess.

Carefully place the pastry over the tomatoes, mustard-side down. Cut of the excess pastry and fold the edges around the tomatoes. Cut a hole in the center of the pastry to let out excess steam. Put the pan back into the oven and increase the heat to 350F. Cook the tarte for 15-20 minutes, or until the pastry is golden brown.

Once the pan is out of the oven, run a knife around the edges to release any parts of the pastry that stuck to the side of the pan. Place a plate over the pan and carefully flip the pan over onto the plate.

Season with plenty of salt and pepper and add the basil. Then, drizzle the tarte with olive oil. 


After the tarte was finished, I took the salad and the tarte to the table and we just served ourselves. It was absolutely beautiful. Granted, I should have used a prettier bowl :)

Delicious! This is the type of lunch you can serve to guests. It is just so beautiful and so easy. My husband even said it felt like the kind of lunch we should have been drinking white wine with... unfortunately, we were all out.

Have a lovely Sunday and I hope you try these out... so easy and so gorgeous. Beautifully delicious!

Happy Eating

Read more...
The Magic of Roasting Peppers

>> Friday, January 21, 2011


This is a picture of most of the ingredients of a salad I'm going to make on Sunday (I know... it's a little early) but I just wanted to post about roasting those beautiful bell peppers you see above. I love roasted peppers. The magical things that happen when you roast a pepper is beautiful. The pepper becomes soft and sweet. I put them on everything, and I mean everything. Salads, in soups, on sandwiches, in wraps, with Tex-Mex, I make pasta sauces out of them, and I garnish dishes with them. I could literally eat a roasted pepper in its entirety and with nothing else. I love this stuff!

Yes, you can get roasted peppers in a jar, but if you have the time roast peppers yourself. I bought roasted peppers in a jar once. It was my first and my last time. They just didn't taste as fresh and they were too soggy (I like that fresh peppers stay very slightly crunchy). It is super easy and totally worth the 10-15 minutes. These peppers will be in the salad I'll post about on Sunday, so I'm just getting a head start :)

Roasted Bell Peppers

Whole bell peppers (any color)
1 small plastic sandwich bag per pepper

There are many ways to do this, and I'll cover two here: with a gas range and with an oven.

First, wash your pepper.

Turn on a gas eye and place the pepper onto the eye. Rotate the pepper with tongs until the entire pepper is completely charred and black.

This will not work on electric stoves! If you have electric range, then just pre-heat your oven broiler on high and slice the peppers in half length-way. Remove the membranes and seeds and place the pepper halves cut side down onto a baking sheet and place under the broiler. Keep an eye on the peppers and remove when the peppers turn completely black. This will take about 5-10 minutes, depending on how hot your broiler gets.

Once the peppers are charred, take the peppers and place them into plastic sandwich bags. Close the bag and set aside (seam-side down if the bag does not have a zip). Wait for about 10-15 minutes to allow the pepper to sweat... be patient. Magical things are happening!

Once the time has elapsed, remove the pepper. You can remove the skin by just peeling off all of the skin or you can hold the pepper under running water and it will fall off.

Now, you can store these for later use. If you roasted the whole pepper, make sure you slice the pepper and remove the seeds and membranes before storing. Just place the peppers into an air tight container. It will keep in the refrigerator up to 5 days.

Slice them up and use them on everything! I'll show you one of my favorite salads using these beauties on Sunday. Sorry, I couldn't wait that long to share this with you!

By the way, if you figure out a way to use these in dessert, please share with me! I would eat them that way, too :)

Happy Eating!

Read more...

Polenta Lunch for One

>> Saturday, January 15, 2011

I woke up starving this morning. After puttering around the house some, I gathered up some things around the kitchen and came up with this simple, fast, and vegetarian lunch. I made a creamy Parmesan polenta with caramelized onions, mushrooms, and wilted arugula. I really enjoyed this lunch and it was so satisfying.

The polenta is so creamy and had a great flavor of the Parmesan. The onions were sweet and the mushrooms were earthy. The arugula was peppery, but not bitter. All of these components came together beautifully and I think this dish is really appealing to the eye, too. Try this recipe... you won't be disappointed and you'll love the flavors. I made it for just myself, but the recipe is written for 2 people.

Creamy Parmesan Polenta with Caramelized Onions, Mushrooms, and Wilted Arugula
Serves 2

For the Polenta:
1/2 cup instant polenta
1 cup boiling water
1/4 cup grated Parmesan
1 tablespoon butter
salt and pepper

For the Veggies:
2 tablespoons butter, divided
1 medium onion cut into thin slices
fat pinch of sugar
8-10 small mushrooms, cut into slices
a large handfull of arugula
salt and pepper

First, gather the ingredients for the vegetables.

Slice the onion and heat a heavy-bottomed skillet over medium heat. Melt 1 tablespoon of butter and add the onions.

Add the sugar and stir everything around. The sugar will add a bit of extra sweetness to the onions. Turn the heat down to low and cook slowly for 15 to 20 minutes, stirring occasionally. (Please disregard the look of my pan... it's had a rough life).

While the onions are cooking, slice the mushrooms.

The onions should cook until they are completely soft and have started turning golden.

Add the mushrooms to the pan and sprinkle liberally with salt and pepper. Stir everything around and turn the heat back up to medium heat. Cook the mushrooms until the mushrooms have released all of their juices and the onions become an even deeper brown color.

While the mushroom and onion mixture is cooking,get the ingredients of the polenta together and put the polenta in a small bowl and heat up the water. You can do this in the microwave, on the stove, or (like I do) with an electric kettle. Electric kettles are the best invention ever! I know I use mine at least once everyday. You literally can have boiling in less than 60 seconds. Sorry, I digress...

Once the water boils, add it directly to the polenta a little at a time, whisking the constantly. Don't add all of the water here, just enough to cook the polenta and until the mixture is stiff.

Add the butter, Parmesan and salt and pepper. Stir to combine everything and add more water until the polenta is to your desired consistency. I like mine really creamy. Adjust the seasoning one last time.

 The mushrooms and onions should be finished, and stir everything around and adjust the seasoning.

I love arugula. It is peppery, spicy, crunchy, and Germans seem to be obsessed with this stuff, and now I am too! What's great is that it comes in these little tubs in the grocery store and the leaves are already trimmed and washed. Perfect! If you find that your arugula has long stems, trim those off.

Add the arugula to the pan and turn the heat to low. Stir everything around, making sure that the leaves start to wilt. Don't overcook because they will become bitter (bitter arugula = yuck!). This will not take long: 30 seconds to 1 minute, tops.

Add the polenta to a bowl (I love the color).

Top it with the mushrooms, onions, and arugula and sprinkle with a little Parmesan.

This is a great dish and so versatile. You can use spinach or red onion. Add shrimp or strips of chicken if you want to make this a little heavier.

Try this out... it is so yummy!

Happy Eating!

Read more...

  © Blogger template Simple n' Sweet by Ourblogtemplates.com 2009

Back to TOP